Thank you so much for your patience waiting for the rest of the tutorials for my Disney Princess Inspired Quiet Book. Today I’m going to share how to complete the Sleeping Beauty Search and Find Pages.
Don’t forget to check out my completed Disney Princess Inspired Quiet Book!
NOTE: When I created the quiet book, I completed all the pages and then sewed them together. That means that each of the pages has about 1/2 inch on three sides that will “disappear” when sewn to the next page. The fourth side will be used for binding the book together. You can see the finished book here. The instructions for the binding will be in a future post.
THESE PATTERNS ARE FOR PERSONAL USE ONLY AND NOT FOR SALE. YOU MAY NOT MAKE ITEMS FOR SALE OR PROFIT. IF YOU WOULD LIKE TO SHARE THESE QUIET BOOK PAGES, PLEASE GIVE ME CREDIT BY LINKING TO MY PAGE.
Materials:
– felt (light blue, dark blue, green, dark brown, light brown, beige, gold, red)
– fabric paint (brown, green)
– glue
– Shrinky Dink Plastic
Instructions:
1. Trim both background light blue felt so it is 10 inches by 8 1/2 inches (this will be the standard size for all the pages in this quiet book).
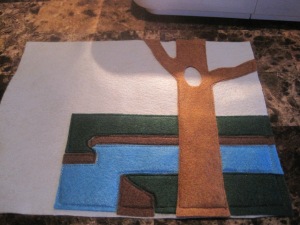
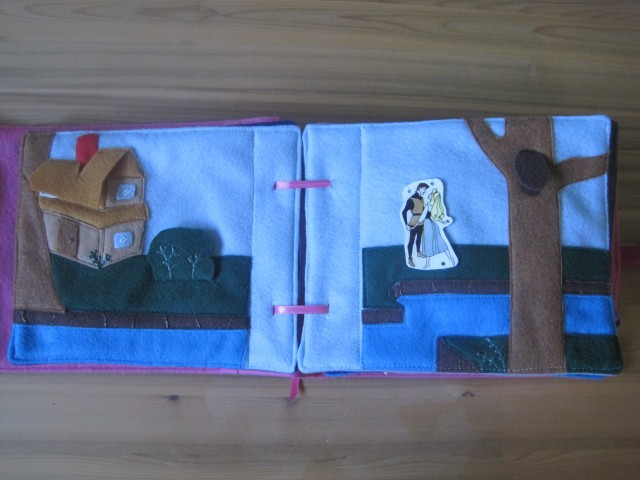
 2. First the right hand page. Cut out the various pieces for the landscape and sew in place as shown. I started at the bottom and worked my way up. It meant switching thread in the sewing machine each time, but it also meant that everything would fit together.
 3. Cut the hole out of the tree and sew the tree in place. From the dark brown felt, cut two dark brown ovals the same size as the hole in the tree. Glue one in the hole (only glue around the edges otherwise sewing on the owl is a lot more work) and the second one, sew along the top to make a flap.
 4. The left hand page is a bit more time consuming. Cut out the pieces and sew in place as shown in the picture. Sew the bush only along the bottom edge to create a flap that opens downwards. Sew the roof along the top to create the flap.
 5. I found pictures using a Google search for the couple dancing, the owl, and the fairies. It took a bit of trial and error to get things to the size I wanted, so be patient with this step. I traced the images onto the Shrinky Dink plastic and then coloured with permanent markers. Once they were shrunk, I put a layer of clear nail polish over top to keep the colour from being worn off. Don’t forget to make holes in your shapes before you shrink them so that you can sew them onto the page! Sew in place.
 6. Using the fabric paint, paint on the details as shown in the pictures. Let dry and the pages are complete!

Hi! Could you please share how to bind the pages together?
Thank you!
Thanks for visiting my site! I hope you have been enjoying the tutorials! The instructions for finishing the pages as well as making the cover can be found in the “Quiet Book Cover” post. I don’t have tons of pictures, but hopefully the instructions will be clear enough. Happy Crafting!