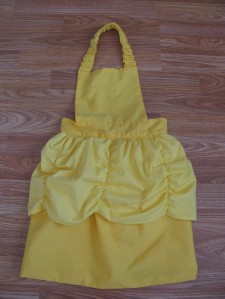
 Part of our morning routine involves putting on a movie for my daughter to watch. E has been enjoying watching lots of Disney movies and one of her current favourites is “Beauty and the Beast”. She also loves to dress up so I figured it was time to try my hand at making a “Belle” dress-up apron like I’d seen on Pinterest.
After looking at several patterns and pictures, I decided how I was going to proceed. I got most of my measurements and inspiration from this site, but then made some modifications which I’ll share in this post. One of the things I modified was the neck strap. With a newborn at home now, I wanted to make sure that my daughter would be able to put on and take of the “dress” with as little help from me as possible. The neck strap stretches over her head instead of having it tie in the back. I ended up having to go back and shorten the elastic to make the neck strap a better size, so the pictures show a longer neck strap than you’ll get if you follow the instructions.
Materials:
– dark yellow fabric
– light yellow fabric
– elastic (in two widths – 1 inch and 1/4 inch)
– hook and loop closure
Instructions:
1. The first step is to cut out all the pieces.
Out of the dark yellow fabric cut…
- Strap: 4 x 22 inches
- Bodice: 8 1/2 x 8 inches (cut 2)
- Waist Band: 3 x 28 inches (cut 2)
- Skirt: 16 x 38 (cut 2)
Out of the light yellow fabric cut…
- Skirt Overlay: 12 x 42 inches
 2. Fold the neck strap in half, right sides together, and sew along the long side using a 1/2 in seam allowance. Turn inside out, press, and top stitch along both long sides about 1/4 in from the edge.
3. Cut a 15 inch piece of 1 inch width elastic. Insert it into the strap.
 4. Line up the ends of the elastic with the ends of the strap and pin or baste in place. The elastic is shorter than the fabric which will allow it to stretch over your little one’s head.
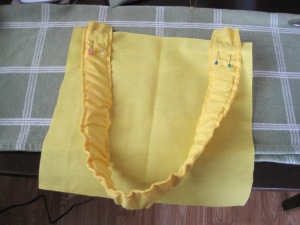 5. Pin the strap to the right side of the bodice front about 1/2 in from the side edges. There will be 1/2 inch of the strap going over the top edge. Baste in place.
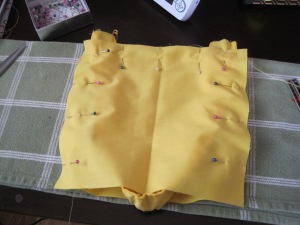 6. Place the back of the bodice on top, sandwiching the strap in the middle. Pin in place then sew around the sides and top using a 1/2 in seam allowance.
8. Take one waistband piece and fold under all four edges 1/2 inch and press. Repeat with the second waistband piece.
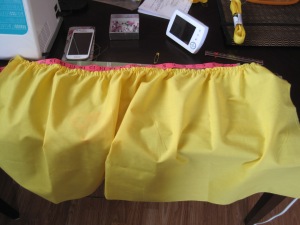 9. Sew gathering stitches along the top edge of each dark yellow skirt piece and gather to 27 inches. Set aside.
10. Take the skirt overlay piece and hem the bottom: press the bottom edge 1/4 in under, then fold over again, press, and sew the hem.
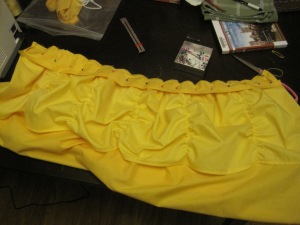
 11. Mark on the wrong side of the skirt overlay, every 7 inches along the bottom as well as at the top, approximately 1 inch from the top edge. Cut five lengths of the 1/4 inch elastic to 7 1/2 inches. Pin the elastic at the marks you just made. (The hemmed bottom of the skirt is at the top of the picture.)
 12. Sew along the elastic, stretching it so it lays flat against the fabric. Once sewn, because the elastic is shorter it will create the gathers.
 13. Sew gathering stitches along the top edge of the skirt overlay and gather to 27 inches.
 14. Place the overlay on top of the skirt front. Baste along the sides and gathered edge.
 15. Place the back of the skirt over the front piece, right sides together, and sew along the bottom and sides. Turn inside out and baste gathered edges together.
 16. Unfold the long edge of one waistband piece and pin along the gathered edge of the skirt front. Sew in place.
 17. Unfold the other edge of the same waistband piece and pin the bodice in the center. Sew in place.
18. Turn the apron over so the front of the apron is facing away from you and pin the second waistband piece so that it is lined up with the first piece, covering all the raw edges. Top stitch along all four sides.
 19. Cut a 7 inch length of the “hook” part of the hook and loop closure and a 4 inch length of the “loop” part. Sew onto the waistband as shown in the picture.
 20. Watch your toddler enjoy her new “dress”!
Now to wait for another sale at the fabric store so I can make Cinderella and Sleeping Beauty aprons…and maybe some other princesses too! 🙂
THIS PATTERN IS FOR PERSONAL USE ONLY AND NOT FOR SALE. YOU MAY NOT MAKE ITEMS FOR SALE OR PROFIT. IF YOU WOULD LIKE TO SHARE THIS PATTERN, PLEASE GIVE ME CREDIT BY LINKING TO MY PAGE.

