It’s sewing time! I’m excited to share with you my first ever FREE pattern and tutorial for a baby smock bib. 🙂
I don’t know about your kids, but my baby is certainly a messy eater! She likes to feed herself and usually ends up with food everywhere. Even when we try to feed her it gets a little messy. Easter dinner ended up all over her face, hands, hair, ears. Fortunately she was wearing her smock so her clothes were at least unstained. 🙂
When we first introduced E to solid food, we quickly figured out that the regular bibs weren’t going to work. So I went out and found a smock that I hoped would do the trick. It was made out of vinyl or something that seemed like a great idea, but really didn’t come clean and it wasn’t too long before holes were starting to form. I took it apart and used the pieces as a rough template for a cloth version. The original smock was for 18 M. I decided to make it about the same size, but since my daughter is only 10 1/2 months, we just roll up the arms to make them a bit shorter for now.
The front of the smock is made up of denim from three pairs of my old blue jeans (might as well use them for something!). Denim is a fantastic choice for a bib since it doesn’t stain easily. 🙂 I’ve used various types of fabric for the back and sleeves so you can probably use whatever you have on hand. In this tutorial I’m using flannelette, but I’ve also used broadcloth and even a cut up cotton t-shirt. As long as it’s washable, I don’t see why you couldn’t use it.
I was at FabricLand and found this super cute fabric with the pea pods. Ok, maybe white isn’t the BEST choice for a bib, but it was so cute I just couldn’t resist. 🙂
But enough chatter…on to the tutorial.
Materials:
– fabric for sleeves and smock back (can be the same, as in this tutorial, or different)
– denim for the smock front (I used my old blue jeans)
– double fold bias tape (around 2 1/2 yards or meters)
– coordinating thread
– hook and loop closure
– Smock Pattern and tape
Instructions:
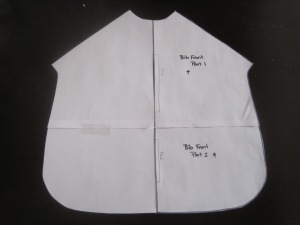
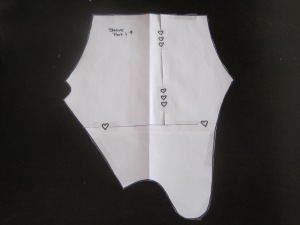
1. Print, cut out, and tape the pattern pieces together.
There are 3 pieces for the sleeve and 2 pieces for the front. Overlap the pieces so that the shapes are complete.
You will need to create the reflection of the front so that you have a full shape. I just have half in the pattern so that it was easier to share. Here’s what your pieces should look like. (Ignore the “Fold” written in pencil)
2. Cut out your fabric.
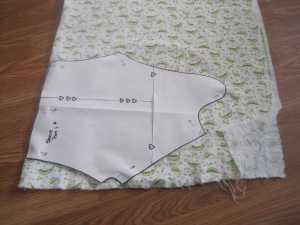 Fold your fabric with wrong sides together and cut out the sleeves.
Cut the smock back using just one layer of fabric, either of the same fabric or a coordinating fabric.
3. Create the denim smock front.
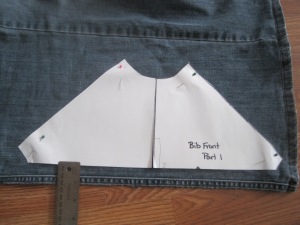
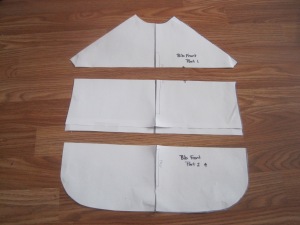 This is where you can get creative. Because I used my blue jeans the front will not be in just one piece. Here’s what I did. I took the pattern for the smock front and divided it into three sections. I just did vertical lines for this tutorial, but the sections can also be cut on an angle.
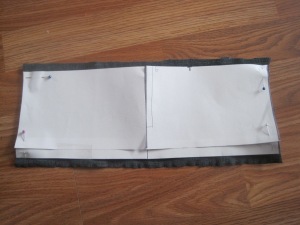
Pin each section onto the denim and cut out. Here’s the important part: make sure to add about 1/2 inch extra on the “cut” side. This is so that you can sew the pieces together, creating the front of the smock.
Here are my pieces all cut.
T ake the bottom and middle pieces and pin with right sides together. Repeat with the top and middle pieces.
Sew each pinned section using a 1/2 in seam. Trim the seams and iron open. Put aside for now.
4. Prepare the sleeves.
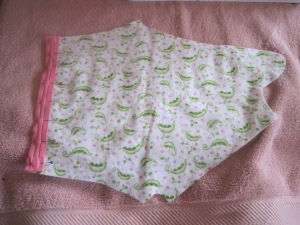 Pin and sew the bias tape onto the straight edge of the sleeve. If this is your first time using bias tape, there are lots of great tutorials online. Basically here’s how you do it. When folded the bias tape is slightly longer on one side than the other. Taking the shorter side, unfold it and pin, right sides together, to the sleeve as shown in the picture. Sew along the fold.
 Next, remove the pins and fold the bias tape over the edge. With the right side up, since that’s the side that is going to be visible, sew along the inner edge (basically where you were first sewed the bias tape to the sleeve).
 Once the bias tape is sewn on, fold the sleeve as shown in the picture. Sew using a 1/2 in seam.
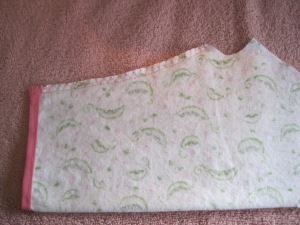 Trim the excess material. I did a zigzag stitch which will hopefully prevent too much fraying from happening when it is washed.
5. Attach the sleeves to the front of the smock.
 Take the denim front and fabric back of the smock and pin, wrong sides together. If you are feeling ambitious, baste them together, leaving the openings for the sleeves. Basting would help eliminate blood stains from pin pricks! 🙂
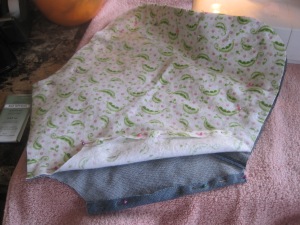 Fold down the openings for the sleeve about 1/2 in as shown in the picture.
 Pin the sleeve (the non-sewn straight edge) in between the two layers. Make sure you have the correct sleeve on the correct side! The rounded part goes in the back of the bib, around the baby’s neck. Sew in place. I sewed fairly close to the edge of the denim. You just want to make sure that all the layers are sewn together.
6. Add bias tape to finish the edges.
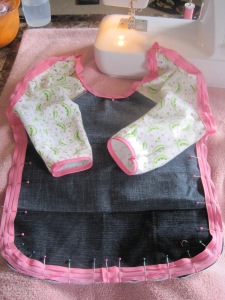 Here’s the most dangerous part of the project…there are a lot of pins! Pin and sew the bias tape around all the unfinished edges. It does get a little tricky, so have patience during this step.
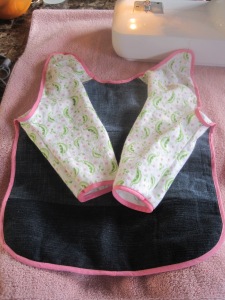 You’re almost done! And hopefully you’ll have a bit more luck than I did. My sewing machine needle was on it’s last legs and seemed to hit every other pin until it finally broke! I replaced the needle and finished the project.
7. Attach the hook and loop closure.
It doesn’t really matter which side overlaps, but I would suggest that you put the “hook” part on the side that will be on the top. Reason for this…it won’t get stuck in hair! Ouch!
 Cut about an inch of the “hook” part and sew in place. You can either do the same size for the “loop” or make it slightly bigger, which allows for a bit more size variation.
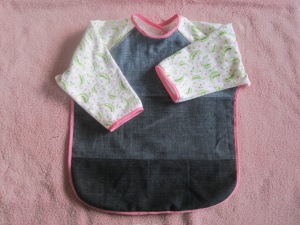 And you’re done! Congratulations! I’d love to hear how yours turned out!

