Mother of Two!

Mother of two!  That’s my new role in life.  Wow!  It is hard to believe that my son is already a month old!  It feels like it has gone by so quickly in some ways, but also like he was just born yesterday.

Life has been a bit hectic over the last month, as I’m sure anyone with a toddler and newborn can relate.  It is lots of fun having a newborn again.  So sweet.  So small.  So cozy.  It has also been hard having a newborn again.  Little sleep.  Lots of feeds.  Sore body.

In an earlier post I shared my daughter’s birth story.  Here is my son’s.

Throughout the pregnancy I was pretty nervous about the delivery.  I had needed a c-section with my daughter and had suffered from major panic attacks, bad enough that they needed to put me under to keep me from shaking so they could get her out.  I had a couple small panic attacks when I was pregnant with my son, which only fueled my worries about his delivery.  My goal was to be conscious for his birth.

My doctor and I discussed how I wanted to deliver my son, and we both agreed that a repeat c-section was probably a good option.  As the time got closer, I was able to meet with the doctor who had delivered my daughter and was able to schedule a date for her to perform the second operation.  I was very happy to have her again.

Very different having a planned c-section compared to an emergency one.  Things were much calmer, but still nerve wracking.  I was scheduled for Tues, Feb 24 at 1:00 pm.  My husband and I arrived at the hospital around 11:30 that morning.  I was given a gown to change into and settled onto a bed to wait until they were ready for me.  As expected, things weren’t exactly running on schedule so we waited for quite awhile.  Eventually the nurse came for me and we walked down the hallway to the room just outside the OR.  There I met with the anesthesiologist who walked me through the meds I would be getting.  (I have to say that when I booked the c-section, I really wanted the same doctor; if we have another kid, I want to book with the same anesthesiologist!  He was fantastic, letting me know what was going to happen and helping me stay calmer than I otherwise might have been.)

A nurse led me into the OR.  That room is a very bright room!  A lot smaller than I realized.  I was helped onto the table and given, first a mild sedative (because of my panic attack history) and then a spinal.  Unlike an epidural which feels like ice being poured down your back, the spinal started with heat in my toes.  An interesting sensation.  Before it completely kicked in and I couldn’t move anymore, I laid down on the operating table and the screen was put up and they finished getting ready to start the operation.  Once I was ready, my husband was permitted into the room.

I remember a bit of pressure being put on my belly.  I’m convinced I could feel being cut open – no pain, just that something was happening.  I was crying for most of the operation, with the anesthesiologist and my husband offering reassuring words of comfort.  I wasn’t aware of the reason until afterwards, but eventually the anesthesiologist told me that he was going to put me under for just a few minutes.
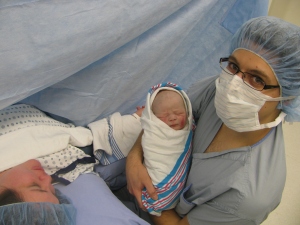
IMG_0490When I came to, there was my husband, holding our son!  (So much for being conscious for the delivery!  Oh well!)  I had been out for no longer than about five minutes.  Enough time for the doctor to use forceps and extra force to pull the baby out!  (I didn’t even know that they might need to use forceps with a c-section.)  After I was conscious again, they quickly finished up the operation, and I was moved to the recovery room.

In the recovery room, I got a chance to actually hold my son.  At 8 pounds 10 ounces, he was a lot bigger than I had thought he would be.  Of course, as a newborn, he was still so tiny!  He had an angry red mark on his cheek and bruises on his ears from the forceps, but I was told that they would disappear within the next day or two.  I think the red mark on his cheek was gone by that evening!  Magic baby skin as my sister says.

IMG_0498After about an hour in the recovery room, making sure things were going how they should, I was moved into a private room on the postpartum unit.  My parents, one of my sisters, my husband’s parents, and his sister were there to meet our little boy and shortly after, my other sister arrived, bringing our daughter.  I got a little teary eyed when I saw my grown up little 21 month old!  My mom shooed everyone out, but thankfully, my one sister pushed my other sister back into the room to take some pictures of our new little family.

We have now been a family of four for over a month.  Our daughter, E, loves her new baby brother, C, showering him with kisses and hugs.  Whenever we put him on a play mat, she immediately leaves whatever she is doing to cuddle with him.  I’m still adjusting to being a mother of two, trying to balance my time between both my children, my husband, while still getting some “me” time.

I am totally in love with my new baby boy and am looking forward to the joys and challenges of having a son.


Disney Princess Inspired Quiet Book: Marble Maze and I-Spy

The Little Mermaid – one of the first movies I remember seeing in the movie theatre. Today I’ll be sharing the tutorial for making The Little Mermaid inspired pages.

IMG_4099

Don’t forget to check out my completed Disney Princess Inspired Quiet Book!

NOTE: When I created the quiet book, I completed all the pages and then sewed them together. That means that each of the pages has about 1/2 inch on three sides that will “disappear” when sewn to the next page. The fourth side will be used for binding the book together. You can see the finished book here. The instructions for the binding will be in a future post.

THESE PATTERNS ARE FOR PERSONAL USE ONLY AND NOT FOR SALE. YOU MAY NOT MAKE ITEMS FOR SALE OR PROFIT. IF YOU WOULD LIKE TO SHARE THESE QUIET BOOK PAGES, PLEASE GIVE ME CREDIT BY LINKING TO MY PAGE.

Materials:

– felt (turquoise, purple, green)

– marble

– ribbon

– clear vinyl (rather than buying vinyl at the fabric store I used the packaging from an item I bought at the Dollar store)

– Shrinky Dink plastic

– permanent markers

– clear nail polish

– seed beads (at least that’s what I think they are called)

Instructions for Marble Maze page:

1. Trim the background turquoise  felt so it is 10 inches by 8 1/2 inches (this will be the standard size for all the pages in this quiet book).

2. Cut a second turquoise felt so that it is 7 1/4 in by 7 in.
IMG_40193. Sew the square on top of the background felt about 3/4 in from the left hand edge of the background felt.  Once you have three of the sides sewn in place, put the marble underneath and sew the fourth edge in place.


IMG_40224. Moving the marble as needed, sew the maze lines as shown.  Each section is about 3 1/2 in wide


5. Create your figures for added interest.  I found some images through a Google search and printed them in the size I needed based on how much the Shrinky Dink plastic would shrink.  Once I had the images sized, I traced them onto the Shrinky Dink plastic, coloured them with permanent markers, punched the holes for sewing, and heated them in the oven.  Once they were out of the oven and cooled, I painted them with the clear nail polish.  (I found that some colours, like red, tended to run even though they were permanent markers.  To avoid that, let the nail polish drop onto the image instead of painting the polish.  Hopefully that makes sense.)

IMG_40236. Once the polish is dry, sew the images in place and the pages is completed!


Instructions for I-Spy Page

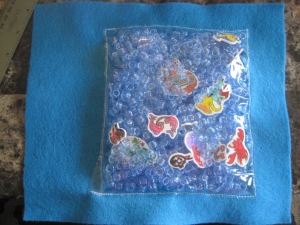
IMG_39231. First create your images.  You could either find stuff to put in or create them yourself.  I decided that I wanted to do an “Under the Sea” theme and found images through a Google search.  I think traced the images onto Shrinky Dink plastic.  Once I had traced the image on one side, I flipped it over and went over the same lines, making the image double sided.  I then coloured the images using permanent marker, trimmed the images, and put them in the oven.  Once shrunk and cooled, I coated them with clear nail polish, letting the first side dry before repeating on the opposite side.

IMG_40122. Take a picture of the items.  I printed the picture then bordered it with purple felt.  This was just free hand so I don’t have a pattern for it.  The back is solid purple; the front is vinyl bordered with purple felt.

IMG_4013Sew the pieces together on three sides, remembering to put the ribbon in place.

IMG_4014Insert the picture and sew up the fourth side.


3. Trim the background turquoise  felt so it is 10 inches by 8 1/2 inches (this will be the standard size for all the pages in this quiet book).

4. Cut the purple felt so that it is 6 1/2 in by 7 in.  Then cut out the centre so that the edge is 1/2 in thick on each side.

5. Cut the vinyl so that it is 6 in by 6 3/4 in.

IMG_39686. Pin (place the pins parallel to the edge of the vinyl instead of perpendicular so you only make holes in it where it would be sewn anyways) and sew the vinyl in place on three sides – 1 3/8 in from the right side of the background felt, 1 in from the bottom of the background felt, and 3 in from the left side of the background felt.  It will be puffy in the middle since you will need room to put in the beads.  Pour in the seed beads and images and sew the top in place 1 in from the top.


IMG_39697. Sew the purple border in place over top of the vinyl.  I sewed along the outside edge and then the inside edge of the border.  This got a little tricky at times because all the beads and images were inside, but just be patient and you’ll get it.


IMG_40158. Sew the opposite end of the ribbon attached to the card in place as shown.


IMG_40169. Cut out your seaweed from the green felt and tack in place using green thread.  And the page is completed!

Merry Christmas and a Happy New Year!!!

It has been WAY too long since I’ve posted anything.  So much has been happening in the last couple months…the biggest thing was our trip to the Mayan Riviera for my sister’s wedding.  Lots of fun…lots of stress (not from the wedding, but from traveling with a toddler – while pregnant no less!)…lots of sunshine and warmth.

And now life is filled with Christmas!  Our tree is half decorated -the top has decorations and the bottom is fairly empty.  E loves taking those ornaments off the tree!  Haha!  We’ve delayed putting presents under the tree until the big event, otherwise I’m sure they would all be unwrapped in a few minutes.

Christmas is going to be a little different from previous years.  Normally my siblings and I gather at my parents’  house for gift opening and dinner.  This year, however, all my siblings are out of town – either visiting with the in-laws or still on their honeymoon.  So tonight for Christmas Eve celebrations and tomorrow, we will be hosting.  I figured it would be a lot easier keeping E on her schedule if we were at home and my parents, being the awesome people that they are, agreed to come over to our house.  It will probably be a little strange for them, but I think it will still be fun.

And now I need to go and tidy up the rest of the house.  The living room is fairly clean, at least for now while E is having her nap.  The kitchen and TV room need a little work.  The important thing, though, is to not stress about the holidays.  If I am stressing I know I’m focusing on the wrong things.

Merry Christmas, Everyone!  Enjoy the lights, and food, and fellowship!

Disney Princess Inspired Quiet Book: Frozen Pages

Thank you SO much for your patience while waiting for the rest of the patterns and tutorials for the quiet book.  Today I’ll be sharing how to complete the Frozen pages.

IMG_4106

Please note that the Elsa figure was created based on someone else’s pattern so I won’t be able to share that part, but the rest will be explained in this tutorial.

Don’t forget to check out my completed Disney Princess Inspired Quiet Book!

NOTE: When I created the quiet book, I completed all the pages and then sewed them together.  That means that each of the pages has about 1/2 inch on three sides that will “disappear” when sewn to the next page.  The fourth side will be used for binding the book together.  You can see the finished book here.  The instructions for the binding will be in a future post.

THESE PATTERNS ARE FOR PERSONAL USE ONLY AND NOT FOR SALE.  YOU MAY NOT MAKE ITEMS FOR SALE OR PROFIT.  IF YOU WOULD LIKE TO SHARE THESE QUIET BOOK PAGES, PLEASE GIVE ME CREDIT BY LINKING TO MY PAGE.

Materials:

– felt (light blue, white, sparkly white, green, gold, dark brown)

– ribbon

– fabric paint (brown, silver)

– glue

– Snowflakes Page Pattern and Build a Snowman Page Pattern

Instructions:

1. I’ll first show the Snowflakes page.  Trim the background light blue felt so it is 10 inches by 8 1/2 inches (this will be the standard size for all the pages in this quiet book).

IMG_34572. Cut out three of each snowflake from white felt.  Using the sliver fabric paint, draw the snowflake details on two of the snowflakes.  Let dry completely.


3. Cut three pieces of ribbon and glue in between a blank snowflake and a painted snowflake.  Let dry completely.

IMG_34644. Place the Ground Snow piece in place and pin the other end of the ribbons as shown in the picture.  Sew around the edges.


IMG_34675. Place the Pocket piece in place over top of the ribbon and sew the bottom and up about a centimeter on both sides.  This will be where the snowflakes can be stored when not in use.


IMG_3468_16. Glue the second snowflakes in the sky and let dry completely.

7. Add an Elsa doll of your own creation to complete the page.


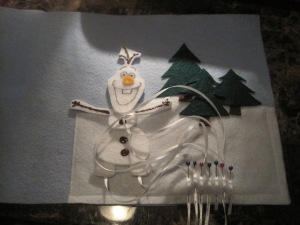
$RBR5Z3Q8. To create Olaf I used a pattern found on this page.  I altered the size when I printed it so that it would fit properly on the felt page.  I don’t have a picture because it was lost, but each shape is cut out twice and a ribbon glued in between.  The ribbon does get in the way a bit, but it helps to keep all the pieces with the page.

9. Cut out Olaf’s nose from gold felt and using an orange marker, draw a few lines to add some detail.  Use a permanent black marker to draw his face on the felt.  Use the brown fabric paint to draw the stick hair, his arms, and buttons.  Let dry completely.

$R749KYY10. Sew the Ground Snow in place and glue the trees and trunks onto the page as shown.  Pin the opposite ends of the ribbon as shown and sew in place.  Trim the ribbons if needed.


$R73806N11. Sew the pocket piece in place, covering the ribbon ends.  And the page is done!

Four Months!

UltrasoundWow!   How did four months of pregnancy happen?  It feels like I just found out that I was pregnant and here I am, almost half way through!

(Note: For those of you following my Disney Princess Inspired Quiet Book tutorials, more will be coming!  I promise!  I hope to get to them soon!)

Now back to the pregnancy update.  🙂

How far along: 17 weeks and 1 day (Due Date is March 1st)

Total weight gain: Still haven’t gained anything yet.

Maternity clothes: Yup.  I’ve been wearing maternity pants and skirts for a while now and have recently switched to maternity tops.  They just fit my changing body better, even though I’m not that big yet.

Stretch marks: No

Sleep: Yes and no.  Some days I feel rested (or at least less tired) while other days I’m completely exhausted!  I’ve been able to sleep in a bit when my husband gets up with E and takes her out of the house so I don’t hear every little noise she makes.

Best moment of this week: Getting to see my baby at the ultrasound (even though it was after the doctor couldn’t find the baby’s heartbeat the day before).  I go for my next ultrasound on October 2.

Miss anything: Still missing food that tastes good.

Movement: The little one is moving like crazy!  I thought I was feeling him/her at the beginning of Sept, but now I definitely know that it is the baby I’m feeling. 

Food cravings: I wish!  I’d love to have something that I really wanted to eat, even if it wasn’t the healthiest.

Anything making you queasy or sick: Most things.  😦

Have you started to show yet: I think so!  I think I’m still in that awkward “is she pregnant or just carrying a few too many pounds around her middle” stage.  Haha!  I’ve started taking belly pictures, but there isn’t much to show yet.

Gender: Still trying to convince my husband that we should find out when the time comes.

Labor signs: N/A

Belly button in or out: In 

Wedding rings on or off: On

Happy or moody most of the time: Totally depends on the time of day.  I’m usually in a better mood in the mornings.

Until next time!  Enjoy the fall weather (hopefully the sun is shining where you are too!)

Disney Princess Inspired Quiet Book: Snow White Pages FREE Pattern and Tutorial

It has been WAY too long since I’ve posted a tutorial for my Disney Princess Inspired Quiet Book.  Today I’m going to show two pages at once since they aren’t too complicated.  So here are the patterns and instructions for the Snow White pages of the book.

IMG_4091


Don’t forget to check out my completed Disney Princess Inspired Quiet Book!

NOTE: When I created the quiet book, I completed all the pages and then sewed them together.  That means that each of the pages has about 1/2 inch on three sides that will “disappear” when sewn to the next page.  The fourth side will be used for binding the book together.  You can see the finished book here.  The instructions for the binding will be in a future post.

THESE PATTERNS ARE FOR PERSONAL USE ONLY AND NOT FOR SALE.  YOU MAY NOT MAKE ITEMS FOR SALE OR PROFIT.  IF YOU WOULD LIKE TO SHARE THESE QUIET BOOK PAGES, PLEASE GIVE ME CREDIT BY LINKING TO MY PAGE.

Materials:

– felt (light gray, dark gray, gold, brown, sparkly white, red)

– beads (15 in total for the counting part; small ones for the trolley)

– ribbon

– fabric paint (brown, silver)

– glue

– buttons (2 for the wheels on the trolley)

– non-breakable mirror (I got mine from a baby toy that I found at Value Village; any shape will work)

– Counting Page Pattern

Instructions:

1. I’ll first show the mirror page.  Trim the background light gray felt so it is 10 inches by 8 1/2 inches (this will be the standard size for all the pages in this quiet book).

IMG_37442. To make the mirror frame, I traced the mirror onto a piece of paper.  Then I drew a line on the inside of the circle so that it would overlap with the mirror when cut out of felt.  I made the frame about 1/2 inch thick.  Draw a crown on paper for your pattern as well.  Cut out the pieces from the felt.


IMG_37453. Glue the mirror onto the felt, slightly to the left so that it will be in the centre of the finished page.


IMG_37464. Glue the gold frame over top of the mirror.  I placed glue so that it would stick to the background as well as the mirror.


IMG_37475. Glue on the red crown at the top of the mirror.


IMG_37796. Finally, paint on the pattern with the brown fabric paint.  If you look closely you’ll notice that I did more loops on one side than the other, but I don’t think my daughter has noticed.  And the page is done!


7. Sadly, I have lost the pictures for the steps for the counting page due to keyboard smashing by my daughter.  😦  (Check out this post to read the details).  However, I will still write down the steps and the pattern is given above.

Trim the background light gray felt so it is 10 inches by 8 1/2 inches (this will be the standard size for all the pages in this quiet book).

8. Cut the “Cave” out of dark gray and position on the right side of the background felt.  Don’t sew it down yet.

9. Cut five ribbon pieces and pin in place, under the dark gray cave.  Move the cave piece out of the way and sew the ribbon on one side.  String the beads on the ribbons as shown in the finished page.

10. Pull the ribbon tight, pin in place, and sew the opposite end.  If you find that the ribbons are droopy, simply pull it a little tighter and resew.  Remember, it doesn’t have to be perfect.

11. Reposition the cave piece and sew in place.  Using the sliver fabric paint, write the numbers as shown.

12. Cut the “Pile of Jewels” from sparkly white and sew in place on the bottom right-hand corner.

13. Cut out the “Trolley” and sew in place as shown.  Using brown fabric paint, paint on the details of the trolley.

14. Sew on small beads, “filling” the trolley with jewels.

15. Sew on the buttons to make the wheels of the trolley.  And you are done!


I hope you have fun making these pages.  I’d love to hear how yours turned out!

Binding instructions will be in a future post!

My Baby is Going to be a Big Sister!

Elsa Big Sister


I figure it’s time to make it officially known that I am pregnant with Baby #2!  Most of the time I’m too busy to remember, but then I find myself wondering why on earth am I so tired and/or grouchy and/or nauseated and then I remember that there is a tiny human being growing safely inside.

This is the picture that we used to announce to family and friends that our little E is going to be a big sister!  I wanted to do something fun, but wasn’t feeling super creative so I’m happy with how this picture turned out.  🙂

So in case anyone is interested, here are some extra details…(I don’t know who originally came up with this list, but I’ve seen it on a few blogs, and I figured I’d join in the fun)

How far along: 12 weeks and 1 day (Due Date is March 1st)

Total weight gain: I’ve actually lost at least 6 pounds since taking the pregnancy test due to nothing being appetizing these days!

Maternity clothes: Oh yes!  I started my new job right before I found out and since none of my regular pants were fitting properly anyways, I figured I might as well be comfortable and started wearing maternity pants.  I am still wearing regular tops though.

Stretch marks: No

Sleep: Seems like I’m constantly tired, more so than with my first pregnancy.  I figure it is because I have a toddler who rises at the crack of dawn (or almost).  I am using two body length pillows to help align my hips and hopefully help with my sciatica.  

Best moment of this week: Posting our announcement on Facebook and getting lots of excited responses.

Miss anything: Food that is appetizing and sits well in my stomach.

Movement: Too early still. 

Food cravings: I wish!  I’d love to have something that I really wanted to eat, even if it wasn’t the healthiest.  The closest thing to a “craving” would be breaded and fried zucchini…it seems to be the only thing that tastes good these days.  That and ice water.

Anything making you queasy or sick: Most things.  😦

Have you started to show yet: I’ve definitely gotten bigger around the middle, but I don’t think it would be obvious to those who don’t know me all that well. Which reminds me, I need to start taking belly pictures!

Gender: Still trying to convince my husband that we should find out when the time comes.

Labor signs: N/A

Belly button in or out: In 

Wedding rings on or off: On

Happy or moody most of the time: Pretty moody a lot of the time (Poor Husband!)

Well there you have it. 🙂  We are pretty excited about having another baby, although a lot of the time I just start wondering what are we thinking having another baby when sometimes it feels like we can barely keep up with E.  

A Boy!

Ten days past her due date, on August 4th, my sister gave birth to a beautiful baby boy!!!

She was scheduled to be induced on August 5th, but I guess the baby figured he was ready to meet the world. Sunday afternoon she started having contractions and around 8:00 pm they called a babysitter and headed for the hospital. My parents and I arrived at the hospital at 10:15 pm. I was excited to be there since with all my other nieces and nephews I always had to work the next day and wasn’t able to meet the baby until the next day.

When we got there my sister was still walking around so we went to wait in the visitors’ lounge. We weren’t in there for too long before my sister and her husband popped in to say hi. She had a couple good contractions and then figured she’d go see the nurses.

A little while later my mom and I were told we could pop into the labour and delivery room for a few minutes. She had just been given her epidural and was starting to relax in the hospital bed. We visited for a few minutes then went back to the visitors’ lounge so the nurses could do their thing.

About twenty minutes later my mom and I headed back to the labour and delivery room. A bunch of nurses and doctors were rushing in and out. Mom went in to see what was going on and I was left standing in the hallway. Before the door was shut I overheard that the baby wasn’t properly positioned. I went back to join my dad in the lounge.

Half an hour or so later, about five minutes after midnight, I couldn’t stand the suspense so I sent Mom a text message asking how things were going. Her response:

“Hard going. Baby in good position now. Almost crowning!”

I guess my sister doesn’t waste time when it comes to delivering her babies. A few minutes later the baby was born!

Mom came into the lounge to let us know the good news then she rushed back into the delivery room. It wasn’t long before we got to go in too.

Little N is beautiful! I can’t get over how adorable he was in that moment. His little cheeks and tiny nose. His adorable fingers. The perfect amount of hair. What a miracle!

I wasn’t able to stick around until they moved her into the post partum room (I was extremely exhausted and WAY past my bedtime!) so I didn’t get to hold Baby N. As tired as I was, I’m so glad I was able to be there. What a special moment for my sister and her family. I feel blessed to have been invited to join in.

The next day my husband, my daughter, and I went to the hospital to visit the new baby. E was fascinated with his eyes and nose and kept laying her head against his (which is how she indicates ‘soft’). And she loved his feet! For the most part she was gentle…at least as gentle as a 14 month old can be…although she did try ripping off the swaddle blanket because she wanted to be wrapped in it instead. Fortunately there was another blanket we could drape around her shoulders. Haha!

It was an amazing weekend! I’m sending out a HUGE congratulations to my sister, her husband, and her two other boys on the safe arrival of Baby N!

Boy or Girl? That is the question.

Life feels a little crazy at the moment. Right now we are all anxiously waiting for my sister to go into labour. She’s due today with her third child! I keep checking my phone, just in case I missed a call saying she was headed to the hospital!

For the first two, she found out the gender, but this time she decided to wait and be surprised. Talking to her about a month ago she said that she has preferred knowing in advance, although she did admit that she can’t make the fully informed decision until after the baby is placed in her arms.

I have two presents wrapped and sitting in my car to take to the hospital. One for a girl and one for a boy. I’m anxious to know which one she’ll be opening! 🙂

With our daughter we did find out that she was a girl from the ultrasound. Although the tech wasn’t very reassuring with her 60/40 prediction. I don’t know why she said that, unless it was to keep us from getting upset at her if it was wrong. If/when the next baby comes around, my husband wants to wait until the baby is born. I’m trying to convince him otherwise. I think the only way I’d be able to allow it would be for the tech to put the info in a sealed envelope…just in case I could change his mind later.

What about you? Did you find out with your kids or did you wait until the delivery room? Did you try it both ways? Which way did you prefer?

Now come on, little baby niece or nephew! We all want to meet you!

Disney Princess Inspired Quiet Book: Tangled Hair Page Pattern and Tutorial

IMG_3733 IMG_3734I’m super pleased with how this page turned out.  This page was inspired by a quiet book page I found through Pinterest.  Don’t forget to check out my completed Disney Princess Inspired Quiet Book!

NOTE: When I created the quiet book, I completed all the pages and then sewed them together.  That means that each of the pages has about 1/2 inch on three sides that will “disappear” when sewn to the next page.  The fourth side will be used for binding the book together.  You can see the finished book here.  The instructions for the binding will be in a future post.

THESE PATTERNS ARE FOR PERSONAL USE ONLY AND NOT FOR SALE.  YOU MAY NOT MAKE ITEMS FOR SALE OR PROFIT.  IF YOU WOULD LIKE TO SHARE THESE QUIET BOOK PAGES, PLEASE GIVE ME CREDIT BY LINKING TO MY PAGE.

Materials:

– felt (light purple, dark purple, cream)

– yarn

– ribbon

– tiny hair clips

– thread

– glue

– Hair Page Pattern

Instructions:

1. Trim the background light purple felt so it is 10 inches by 8 1/2 inches (this will be the standard size for all the pages in this quiet book).

IMG_34492. Cut out the doll, top, and skirt and glue together.  Once dry, glue the doll in place on the background page.


3.  Add the hair.  I never would have known how to do this until I found some instructions on this page.  The instructions were enough to help me figure it out, but I wanted to add some extra detail sharing what I leaned in the process.  🙂

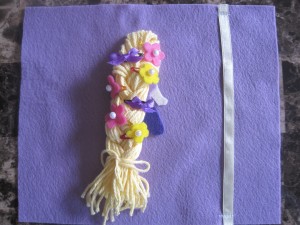
IMG_3488Cut about 21 strands of yarn that are 17 inches long.  Place over the doll’s head as shown in the picture.  (Don’t mind the little chunk taken out of the corner of the purple.  When I made this page I trimmed it after these steps.  The little chunk is actually from where I cut out the dress top.)


IMG_3490Cut off the doll’s head from the paper pattern and pin over top.  This will act as your guide so you know where to sew.  Sew around the paper circle.


IMG_3492Cut 12 more 17 inch strands of yarn and place on the top of the head as shown in the picture and sew in place.


IMG_3494Fold the top chunk of hair down, and braid.  I used a small piece of yarn to tie the braid.

Cut the ribbon to 8 1/2 inches and sew in place on each side.  I’d also recommend sewing a few stitches in the middle of the ribbon just to anchor it in place.


IMG_37314. Now for the hair accessories!  The flowers and ribbons can really be any colours you like.  Cut out the flowers – I did three large ones, two small ones – and then made two bows.


IMG_37295. Sew or glue the flowers onto the mini hair clips.  (My daughter got to the clips before I took a picture so the packaging is a bit torn up!)


IMG_3732I added some “pearls” to the centers of the flowers for fun.  I had bought these pearls from Stampin’ Up! years ago, but probably most craft stores would have something you could use.


IMG_3734Clip the flowers and bows to the ribbon and the page is done!


Binding instructions for my book will be in a future post!


IMG_0259My daughter is enjoying this page and often brings me the clips to put in her hair.  It makes me smile.